
This lab will allow you to get some practice writing simple expressions and statements in Java. It will also give you an opportunity to experiment with interactions among entities and how these generate a variety of basic behaviors. Portions of this lab assignment are also designed to help you build a background in thinking the 6.030 way.
Be sure to read through the 6.030 general information handout, and in particular the collaboration policy. For this assignment, you may discuss the project in as much detail as you like with your classmates, but you should do the writeup on your own. You may also get comments from other students on all portions of your writeup before turning it in, if you wish. Please include the names of anyone with whom you collaborate, in any way, on this assignment, and indicte the nature of the collaboration. [Failure to include this information is a violation of the collaboration policy.]
This assignment emphasizes the following topics
You should read through this entire assignment and complete the Lab preparation sectionbefore you come to lab. Some portions of the PostLab writeup also require your thinking about them before and during the laboratory portion of the assignment.
This assignment is due at the beginning of class on Friday, 24 September.
This week's pre-lab has two parts. Future labs will have more extensive explicit lab preparation but less additional preparatory work.
Do exercises 1 (1-20) and 4 in chapter 5 (Expressions) and exercise 5 in chapter 6 (Statements).
The application that you'll be playing with this week is a simple drawing application. It actually resembles a child's toy called an Etch-A-Sketch. Confusingly, the problem set itself is named after another child's toy, called a Etch-a-sketch.
In case you may not be familiar with an Etch-A-Sketch, here is a brief description:
An Etch-A-Sketch is a rectangular frame (generally red) with a silver screen in the center and two white knobs, one in each of the lower corners. Inside the silver screen is a point of darker grey. As you turn the knobs, the darker grey point moves around the screen, leaving a darker grey trail behind it. By controlling the knobs carefully, you can draw pictures.
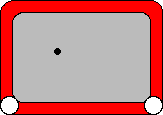

Each knob controls one direction of motion of the darker grey dot. Rotating the left knob moves the dot from side to side. Rotating the right knob moves the dot up and down. By rotating just one knob -- by leaving the position of the other knob fixed, or constant -- you can draw a straight (horizontal or vertical) line. By rotating both knobs at appropriately coupled velocities, you can draw diagonal lines of varying slope.
In this exercise, we will perform similar operations on a similar (though less brightly colored) display. The position of each knob will be represented by a single number. Behind the scenes, an instruction-follower will continually check the position of each knob and update the position of the dot correspondingly. Note that there is one instruction follower for each knob, and they're not guaranteed to operate at precisely the same speed.
Your job will be to write the instructions for the dot position.The trick is that whatever instruction you write will be read (and executed) repeatedly. If your instruction always gives the same value, it will be as though that knob is stuck in one position. If your instruction changes the value, the same change will be made to the knob's position over and over again. (To keep the knob moving, you'll have to make this change relative to the knob's current position. We'll discuss how to do this below.)
Another interesting feature of our program is that the same rule may be used to control both knobs. The knob-rules don't have any way to tell which knob they're controlling. You can experiment with this to see how a rule behaves when it's being used by both knobs, or by one or the other knob.
But on to the details....
In your application, as in the Etch-A-Sketch, there is a blank screen with a dot on it. When the dot moves, it leaves behind a trail. The motion of the dot is controlled by two entities, one for each axis (horizontal and vertical). Each of these entities follows a particular control rule, which you will write. This rule tells the entity how to behave. The control rule is automatically invoked by the application system; your job is simply to write down appropriate control rules.
The form of a control rule is a sequence of Java statements ending in a
return double;
where double is some Java expression with type double. The value returned by your control rule will be used as the new position of the dot.
Q. How would you hold the dot in the same position?
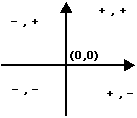
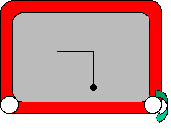
The spirograph window uses a standard cartesian coordinate frame with (0,0) in the center and positive horizontal and vertical coordinates in the upper right-hand quadrant. Although its size varies as you resize the window, you can refer to the coordinate at the edge of the window using the predefined name maxPos. (The lower and leftmost edges are at -maxPos.)
Q. How would you position the dot almost in the upper right-hand corner?
You will be able to see where the dot has moved because every time that the instruction follower moves the dot, it leaves a (black) trail behind it. You can use this feature to draw pictures.
You will also be able to move the dot using the mouse. By clicking in a particular point, you put the dot there. But the instruction followers immediately go back to checking their rules, which may reposition the dot.
Q. Combining these two observations -- leaving trails and "jumping" the dot around using the mouse -- can you figure out how to create an asterisk (a bunch of line segments intersecting in the center)?
These questions should give you some things to think about. Also read through the "in the lab" section, below, to get more ideas. You should plan to complete the labwork up to the portion marked "target exercise".
Your job, in lab, is to write a series of behaviors that cause the application to display certain kinds of pictures. We will suggest a few to begin, but we hope that you will find the environment interesting enough to try a few of your own. You should read through the exercises below and come up with preliminary designs for the code that will solve them. There are also several places where you are asked to predict what your code will do. Be sure to write up your predictions as well as your designs. Bring these notes with you to lab.
Note: There is far more in the lab section than you should expect to do in lab. Do not worry about designing solutions to all of them! One exercise is marked as the target exercise. You should try to get as far as that exercise in lab.
The spirograph application has many advanced features that you will use. For example, you can move the dot around (with your mouse) so that it begins from a different position, or (using an advanced features dialog) you can give the dot initial velocity. Some of these features are described below; some are mentioned in the lab handout; and others are left for you to discover for yourself. One specific feature involves a distinction that you will need to make in lab: You can declare two different kinds of names in your code. One is a temporary name that can be used during a single application of your rule. These names can be declared anywhere in your code. They are called variables. The other kind of name sticks around from one use of your rule to another. These names must be declared in a special box, separate from your rule code, but can be used freely in your rule code. These names are called fields. You can also use name that have been pre-defined for you, like maxPos; these are called parameters. You must declare any fields or variables that you wish to use. We will provide a set of parameters.
This section walks you through a series of exercises of increasing complexity. In future labs, you will have increasing responsiblity for designing the progression from simpler cases to more complex ones. It is always a good idea to build and test a simple version before going on to add many features. Testing should be thorough, and designing good test suites (sets of test cases) is a significant skill. Each time that you add a feature, you should test your code again.
There is more listed here than you can reasonably get through in one three-hour lab.
Static Positioning
Implementing Velocity
We have pre-defined the name pos to hold the current position of the
dot (along the relevant dimension). Each time your rule is used,
pos will have the value at that time. (What value will pos
have if you assign to it?) Using this name and only this name, solve the
following problems.
[Note: although the spirograph application seems to indicate that there are velocity names, these names are not used in position-control mode.]
Implementing Acceleration
Implementing basic acceleration is this week's target exercise. Once you have completed it, you have done all of the coding that you need to do for this week. If you do not get to it, you need not do more coding; we will evaluate what you turn in. However, you should make a point of speaking with a staff assistant.
You should try to prepare the lab up to this point. You should read through the exercises below to see what else this application can do.
Wraparound and other boundary conditions
Try running the code you have so far in wrap-around mode and no-wrap-around mode (using the advanced features), and observe its behavior.
Other cool stuff
You may want to look at the Math library (see the on-line API here if you get serious....)
Using Velocity and Acceleration Controls
Although you can implement velocity and acceleration using position controls alone, Etch-a-sketch is capable of doing this for you, and makes it easier for you to play around with the effects of different code. In the case of acceleration controls, you can think of the ball as a robot with independent horizontal and vertical motors, and your rules as the controls for its motors.
Challenge: Write code that will draw a circle (given an appropriate
initial position and velocity). (Hint: remember a = v^2/r from
Physics.)
You should bring the letter to your pen pal, your finger exercises, and a plan of action for the laboratory (including some thoughts on how to solve the various problems described below). You should have read the entire problem set before you arrive. Your notes from lab will form the basis for your post-lab writeup.
To run Etch-a-sketch in the lab under Code Warrior, you will need to load this week's stationery. Detailed instructions will be available in lab. Note that the Etch-a-sketch application does not take advantage of Code Warrior's editing features. You will have plenty of opportunity to use these in later labs, though.
You can also run Etch-a-sketch directly under Windows NT. To do this, you will need to do the following:
Then, change to that directory by typing: cd Etch-a-sketch
Regardless of how you start Etch-a-sketch, when you run the program, two windows will be displayed. The area with the two large text boxes in it is the code editing area, in which you will write statements that will control the Etch-a-sketch. The window with the dot in the center is the Etch-a-sketch itself. You may want to move the windows so that you can see both windows at the same time.
If you press the Start button in the Etch-a-sketch window, you will notice that nothing happens. This is because the motion rules of the Etch-a-sketch have not been loaded yet. To create a rule, type into the appropriate text box in the Code Editor, and then press the "Load Horizontal (or Vertical) Code" button. This will generate a .java file using your code, compile it into a .class file, and then use this code as the corresponding motion rule for the Etch-a-sketch. (Note: the Etch-a-sketch has been designed so you can load new code even while it is running. However, for more reliable operation, we recommend that you press the "Stop" button before compiling, and then press "Start" again after compiling.)
Messages during compilation are displayed in the MS DOS window from which you initially ran Etch-a-sketch or in the Java Console under Code Warrior. If there are no errors in your code, a message should appear that says, "Compilation successful." Otherwise, error messages from the Java compiler will be displayed. You can then edit your code, and try again.
Try typing a simple statement such as return 10; and compiling it. Try typing an erroneous statement such as return "Ten" and observe what happens.
Q. What is wrong with the latter return statement?)
Load simple rules for both axes, and start the Etch-a-sketch. Can you make the dot go to position (10, 20)?
At this point you should be ready to write your own code to control the Etch-a-sketch. Try to write code that will produce interesting patterns, and see if you can predict ahead of time what the results of your code will be. To use the Etch-a-sketch, make sure you have loaded your code, and compiled it successfully. Then, press the "Start" button on the Etch-a-sketch window, and watch the dot move. You may stop the dot by pressing the "Stop" button. The "Reset" button allows you to do such things as clear the lines drawn by the Etch-a-sketch, and/or put the ball back in the center.
Under each rule is a check-box that allows you to use that rule for both horizontal and vertical positioning. For example, if you use the horizontal rule for both, the vertical text area and "Load" button should be grayed out. The next time you press the "Load" button, any code you enter in the Horizontal text area will now be used to control both the horizontal and vertical motion of the dot. You can also choose to use the Vertical rule instead for both rules. Don't forget to start the Etch-a-sketch. To go back to using both rules, uncheck the box and then click on both "Load" buttons.
In your code, you may make use of the following names, which are of type double:
For example, if a rule is being used as the horizontal rule, then pos would return its x coordinate, and vel would return its velocity in the x direction.
You can use these names to return values that depend on your position.
You can also create your own names by declaring them in your code. These names can be used to hold values throughout a single application of a rule. The next time the rule is applied, however, the values of these variables are lost. These types of names (also called variables or local variables) are useful for providing temporary storage during computations.
e.g., double nextPos;
nextPos = pos * 2;
return nextPos;
Etch-a-sketch also allows you to create names whose values are preserved across different applications of a rule. These are called fields. To create a field, pop up the "Advanced Programing Options" menu and click on a button to edit either the Horizontal or Vertical fields. Another small text area should appear in the Code Editing window. You can declare and/or define fields there. (If your window gets messed-up, just resize it by dragging a side or corner of the window, and it should fix itself.) Note that you can initialize a field by using a definition (a declaration combined with an assignment). In general, it is considered good practice to initialize your fields to a reasonable initial value.
Example:
Fields: int myInt = 5;
Rule: myInt = myInt + 1;
return myInt;
(Can you predict what this code would do? Think about it first, then try it.)
The Etch-a-sketch has several Advanced Environment Options. You can ignore this section, as it does not contain anything you need to know for lab. If you want to investigate further, though, some of these options do neat things.
You can enable or disable certain properties of the Etch-a-sketch window's edge.
You can select whether the values returned by the rules are used to determine position, velocity, or acceleration. Note the following:
You can choose to use the mouse to reposition the dot or to add gravity sources. Or, you may choose not to use the mouse at all. By default, the mouse lets you reposition the dot in the Etch-a-sketch. Adding gravity sources is an interesting advanced feature which we will not use for the lab exercises. You are welcome to play around with them yourself, however.
These entry boxes allow you to set the velocity of the dot. Enter the desired values first, then press "Set Velocity" to actually effect the change.
This section also concerns details for which you are not responsible and is included mostly for the curious.
Etch-a-sketch does not have explicit File management features. However, there are several ways to save your work, if you want to.
The text that you type in the Code Editor window is taken by Etch-a-sketch and inserted into a template that looks something like this:
public class HorizRule implements Accelerator {
// Fields code goes here
public double act (double pos, double vel, double otherPos, double
otherVel, double maxPos) {
// Rule code goes here.
}
}
Everytime you press the "Load" button, Etch-a-sketch generates either HorizRule.java or VertRule.java (depending on which rule you're loading), and then tries to compile it. The .java file is stored in the directory from which you ran Etch-a-sketch, and remains there even after you exit Etch-a-sketch. Thus, you can do whatever you want with this file, such as, copy it, rename it, print it, etc.
When you run Etch-a-sketch, it checks for the existence of these files, and loads the Code Editor window with the appropriate code from these files, if there is any. Thus, one way to save and load back files would be as follows:
Another way to maintain different versions of your code is to use the
commenting features of the Java language. In Java, a anything to the right
of a // is considered a comment and is not compiled. The intent of
this feature is to allow programmers to document their code with useful
comments. However, you can also use this feature to allow you to get
different behaviors from a single source code file. Specifically, you can
have a file that contains code for several different behaviors, and with all
but the desired behavior commented out. Although this maybe a useful trick
for simple and short code snippets such as what you will be writing for this
Etch-a-sketch Laboratory, please note that in general, doing this is not really
good programming practice, as it can result in messy and hard-to-read
code.
Before you leave lab, you will need to have your code checked off by a course staff member. You should allow time for an adequate demonstration and discussion of what you have done. Please do not wait until the last minute to be checked off.
Your completed assignment should include:
also note the following:
Lab assignments are due on Fridays at the beginning of class. They may, of course, be turned in earlier.
This course is a part of Lynn Andrea Stein's Rethinking CS101 project at the MIT AI Lab and the Department of Electrical Engineering and Computer Science at the Massachusetts Institute of Technology.
![]()

Questions or comments:
Last modified: Thu Jul 10 13:01:20 1997